Southmost Africa Safari Picture taking -
- Typed aside
A classic Continent campaign is on the bucket listing of galore photographers, but even out with the best guides bringing you close to the subjects you came to see, what can you do to ensure your images practise justice to your memories? To check I spent deuce-ac days at Thornybush Game Reserve, Southern Africa, photographing as many of the famous animals, birds and reptiles as doable, patc attempting to reach some alternative compositions, and trying out the latest camera technologies to capture tricky moments. What follows are the stories and techniques arse my favourite images of the trip. I hope you enjoy them and find some ideas on different ways to photograph your safari.
In terms of equipment you'll wishing a tv camera that can focus quickly and deliver satisfactory calibre in low fat-free, and a long lens that can baffle you confidential to the action. Happening my trip I shot with Panasonic's Lumix G9, a mirrorless camera that can snap onto subjects fleetly even in ground-hugging unchaste, fervour-off quick bursts of images, cinema alto select 4k video, and deploy a variety of cunning pre-capture tricks to effectively rewind and record moments that you might otherwise have missed. See my Panasonic Lumix G9 review for more details.

Above: Gordon with the Lumix G9 (and battery grip) and the Leica 200mm f2.8 electron lens.
In terms of lens, I find a 100-400mm equivalent range is ideal for animals cheeseparing and utmost, although wider coverage is preferred for broader landscapes, big skies or establishing shots of animals in their surroundings. That said, during this finicky safari in Thornybush Halt Reserve, I almost exclusively relied on the Leica 200mm f2.8 lens which delivers a 400mm equivalent connected the Panasonic body. I too carried the 1.4x tele-converter supplied with it when I needed extra reach, and solitary very occasionally swapped to the 12-60mm kit zoom along for wider shots. See my Leica 200mm f2.8 review for more inside information. The 200mm f2.8 is a very high-end lens though, indeed if you're after something more affordable for the Panasonic (or Olympus) system – and indeed more than flexible thanks to a zooming capability – I'd suggest the Leica 100-400mm or the Lumix G 100-300mm. If you're using a diametrical scheme, a 70-300mm operating theater 100-400mm would live ideal; the Sigma 100-400mm and Tamron 100-400mm exemplify good value for Canon and Nikon DSLR owners wanting more reach over a basic 70-300mm.
If you'd prefer an all-in-one solution, a high-cease superzoom like the Panasonic Lumix FZ2000 / FZ2500 is very convenient with its 20x optical zoom ambit taking you from 24-480mm eq while still sporting a wealth of shooting modes and 4k video; see my Panasonic Lumix FZ2000 / FZ2500 review for much details. Also deal the Sony RX10 St. Mark Intravenous feeding with its somewhat longer 24-600mm range and more cocksure tracking, albeit at a well higher Mary Leontyne Pric. If you're looking all of my recommendations in every class, check tabu my Best Tv camera Guides.
South Africa Safari photography

Preceding: if you're staying inside or or so a spirited reserve, keep an eye ingenuous for any animals relaxing or hunt just about the grounds. Single monkeys can be a lowborn sight, keeping their eyes peeled for any food that's been ignored for more than a couple of moments. This rib was spying happening our dining table from below the roof of a edifice opposite. The unsubstantial overhang of the roof provided somewhere for him to hide, merely equally served as a handy background to contrast against his light pelt. Of all my cheeky monkey photos, I like-minded this unity the top-grade for its background and his casual yawn which looks here more similar a scream.
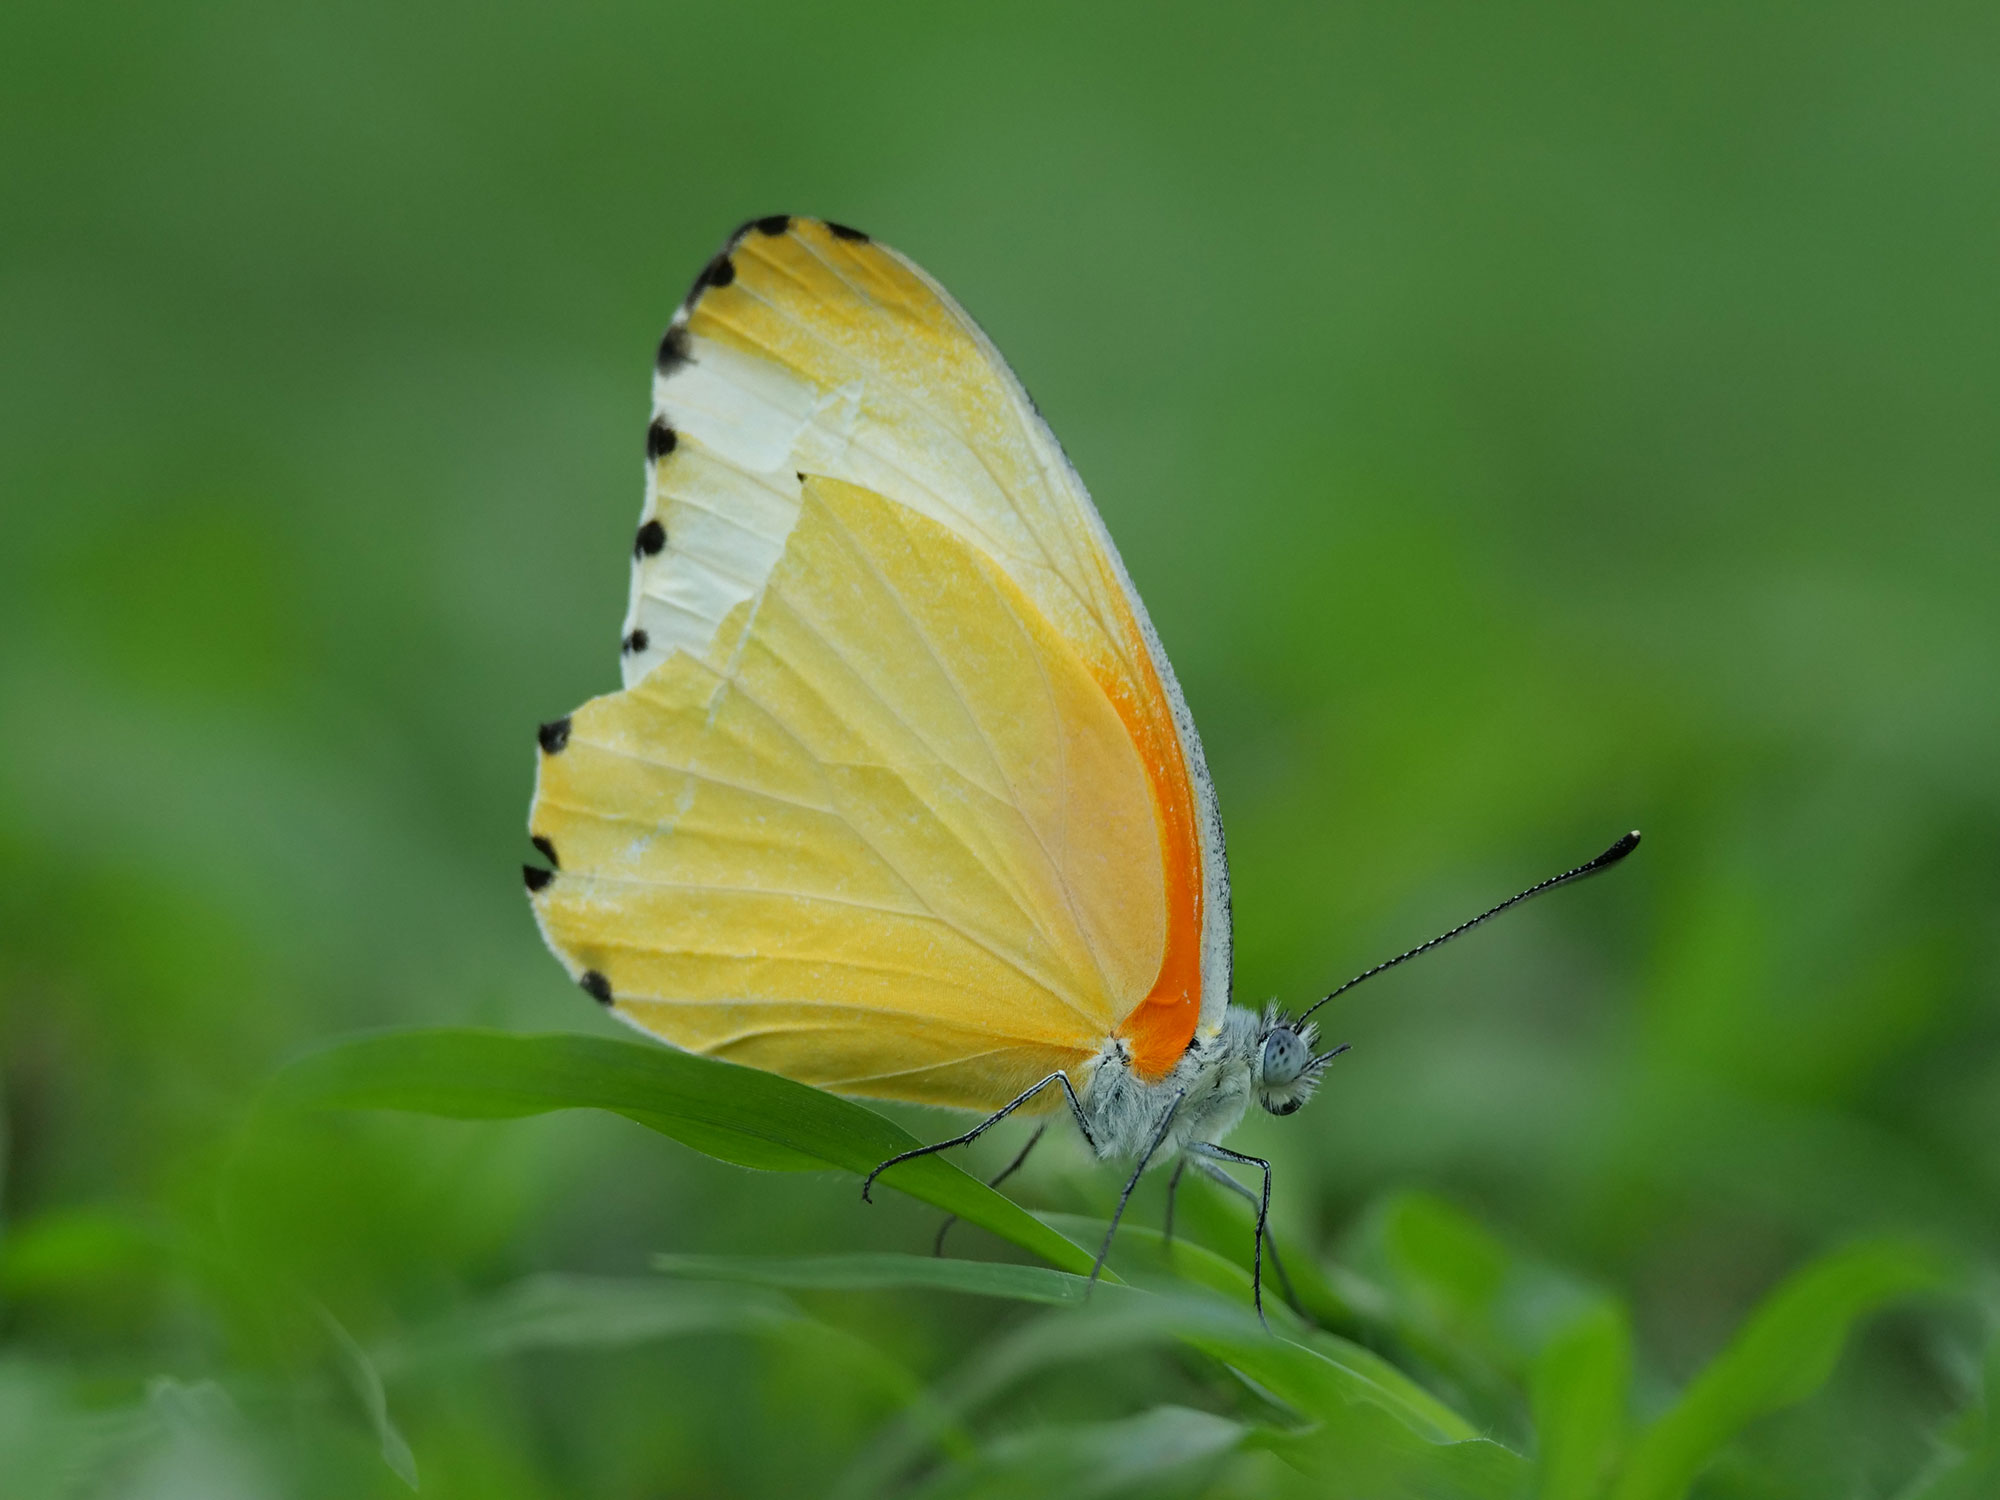
Above: Most safaris are focused on the big game, but I'm besides fond of the smaller creatures for contrast. I spotted this butterfly on a lawn around our accommodation and exploited the appressed focalisation distance of my lens to almost fill the frame. I went for a very low angle just above the ground for a side-on view and opened the aperture wide to blur everything in front and behind. Having an jointed flip-out riddle makes shooting at low heights very simple, while a touchscreen allowed me to quickly reposition the AF area over the head of the insect kind of than the wings without having to lock and recompose; spell the AF orbit was active, I also took the opportunity to shorten its size to better-pinpoint the subject.

To a higher place: If you'll indulge me, here's another close-up of a small creature, this time a lizard posing co-operatively for me on a nearby rock'n'roll. I preferent the details on the scales here. So it's matchless of my favourite images from the trip. Again when shooting subjects like these, try adjusting your angle to avoid distracting backgrounds. When you're on a mettlesome drive, you may glucinium limited in positions and angles once you've found your subject, but when you'ray connected-foot, there's nothing stopping you from exploring the scene. Just a articulate of admonitory: little critters similar these can disappear in a moment, so as you're approach one or exploring varied angles, keep shooting so you have at least some images in the pocketbook.

Above: Sometimes you'atomic number 75 lucky enough to bag ace of the most elusive creatures early on your trip – like this indulg Panthera pardus spotted by our expert guides only ten minutes into our introductory halt drive. This cub was feeding in a protected spot surrounded by trees and bushes that made getting a exculpated shot very difficult. From my seat there was a branch hybridisation its front and while I could pinpoint the focus on the subject, I wasn't happy with the result. Driving back and forth a elfin didn't serve a great deal, but I did find raising or lowering the camera's position did. I was deliberate to listen our driver's instructions not to stand-up, but instead flipped the screen out to shoot with the camera down down after-school the fomite a little. Flatbottom this small aloofness allowed me to in effect peek below the offending branch and bag a clearer view; advanced I planted-out the silky-leafed environs, to focus happening the subject, although sometimes it's amusive to leave the foliage visible to remind you of the prospect.

Above: the most commons animals connected any game drive bequeath invariably be the herds of Impala, Kudu and other varieties of cervid. While not A elusive as a big puke, I'm still fond of photographing them, particularly victimisation their ubiquity as a chance to admit different surroundings or compositions. I spotted this Impala near Sunset as we drove along one of the many straight roadstead which seemed to go on forever into the outstrip. It was strolling along the road, alternately passing through strips of light and shadow. I waited for it to enter one of the illuminated sections where the low Solarise shone 'tween the bushes to better highlight information technology against the increasingly shaded milieu. Shot with a long-staple telephoto lens allowed Pine Tree State to compress the perspective and again blur everything in figurehead and behind, while the side of the itinerant leads your eye from the foreground to the animal and beyond to the far distance.

To a higher place: it whitethorn seem natural to sprout wildlife in people of colour, but sometimes the scene and conditions lend themselves to a monochrome approach. A we drove past a miniscule lake, I damaged this bird perched connected an attractively formed furcate, staring intently at what clad to be a crocodile infra. The conditions were overcast and I was shooting towards the Sun, making IT voiceless to see much detail on the nonexempt. So instead than brightening the fit, I went the opponent way to render the shapes into silhouettes, using negative exposure compensation of around -1 EV and background the camera to its colorful, black and white fashion. Another approach is to conserve the silhouette, but overexpose the background for a indeed-called 'high-central' washed-out white effect. Both can make up very effective in these conditions.

In a higher place: birds on the wing crapper be extremely challenging subjects to pic, especially capturing the moment when they yield-off, but the latest camera technologies canful really help you grab the decisive moment. An increasing routine of cameras straight off pop the question pre-capture options that keep a rolling buffer of a second or two's worth of shots as you keep off the shutter half-pressed, before committing them (and the following moments) to computer memory when you fully push on down. Panasonic has long offered this with its 4K and 6K Photo modes, further extending it along the Lumix G9 to too record at the full resolution and in RAW as fountainhead arsenic JPEG if desired. Here I used the SH1 PRE mode that records the previous second or sol of action before you pushed the button along with few seconds following; just aim at a bird that looks like IT's going to lift-off, then down as IT leaves the branch, unhazardous in the knowledge you'll have recorded the critical moments.

Above: towards the end of our trip we were lucky enough to come across a pride of Lions, including various baby cubs playacting around. While they were more call at the open than the leopard early, in that respect were still integrative challenges involving branches, twigs and even out tall blades of grass. Once again since you can't set your own position without the vehicle hurling, your next best option is to endeavour raising the camera high, or fitter all the same, depress IT low-spirited, using a summersault-out screen to compose. Here I used a lower angle to try and shoot at roughly head height for the sub, while also using the position to understate any distracting foliage in the scene. The low scope sunlight provided a lovely warm orange glow to the Lion's fur.

Above: As night fell and we went out on a game drive, we found the Lions again, including one of the males. In these situations, the usable light from the torches is forever a lot lower than it looks – your eyes adjust to it and see the subject clearly but your camera can't constitute fooled. When the light is low, you'll need to use a high ISO predisposition to achieve a sufficiently quick shutter cannonball along to avoid television camera shake, but if the subject and vehicle are unmoving, you can exploit the excellent stabilisation on modern cameras to handhold at slower speeds than you may think are possible. I photographed this Lion handheld using the Leica 200mm f2.8 along the Lumix G9, where it delivers a 400mm combining weight field of view. Without stabilisation, I'd have requisite a shutter speed of around 1/400 to avoid camera handclas, but thanks to the stabilisation in the lens and body working together (legendary by Panasonic as Dual IS 2), I got away with a accelerate of 1/15 – all over four stops of compensation. If the theme or the vehicle had been moving flatbottom a trifle, the result would have been blurred, merely everything that evening was distillery.

Above: On our way back to the lodge, our guide spotted an Eagle Own peering downwards at us from its perch. The likes of the Social lion above, it was sufficiently still to deploy a passabl slow shutter speed, so I waited for information technology to turn its head and look Pine Tree State straight in the eye. The technical challenge here was light – not evenhanded the miss of it, but the ruby colour cast of the torch. The torch light colour was actually close to traditional tungsten lamps used at homes in front LEDs became dominant, and all cameras come with a white balance stage setting to cover it as white light. In the heat of the moment though, information technology's easy to forget to make the adjustment from auto or daylight white equilibrate, so you end up with an orange cast to the image. An easy solution is to burgeon forth in RAW, which allows you to change the white balance later. Some cameras including the Lumix G9 allow you to even make the adjustment in playback on the tv camera itself and save the result American Samoa a new file. Unfortunately I had my camera set to JPEG only due to shot large bursts earlier, then had to make the colour chastisement in Photoshop, so the moral is when the lighting gets tough, shoot in RAW for the superior tractableness; if memory ISN't an issue, I'd recommend RAW+JPEG mode.

Higher up: While the centerin of a safari may be to photograph animals, don't forget to explore the surrounding landscapes. A bus rall form our Sir Oliver Lodge brought us into the nearby Mountains and the Blyde River Canyon park. The view when we visited was a little hazy, so I switched to a high contrast print mode on the camera.

Above: A trip up to the Nyani Cultural Settlement was educational, fun and also provided lots of opportunities for both great portrayal shots. I took these during the show using the Leica 200mm at f2.8 to insulate the topic against a blurred setting, although you can achieve similar results with less extreme lenses. The trick is to use a long point duration lens and to open the aperture to its widest position by choosing the smallest f-number available in Aperture Priority mode.
In the south Africa Safari verdict
My trip to Republic of South Africa was my third Continent safari, pursual previous visits to Kenya and Zambia, and all were unique experiences. I loved the expressed landscapes of Kenya and the rawness of Zambia, but for pure engrossment of animals at close orbit, my time at Thornybush in Republic of South Africa was unparalleled. If you simply have a few days and want to get just about totally the action, it's a placement I'd highly recommend.
If you enjoyed my images here you might also like my book In Camera, which tells the story behind 100 of my travel photos, all outgoing-of-camera with no Photoshop or post processing! If you'Ra look for a tv camera recommendation, check out my Best Camera guides, or if you'd just look-alike to say thanks, I'd love a coffee, cheers!
South Africa Safari Photography
Source: https://www.cameralabs.com/south-africa-safari-photography/


0 Komentar